The Swift Code之UITableView的基本使用,及修改编辑
数据列表是常见的数据表现形式,使用的频率也是非常之高的.那今天我们先来学会IOS中UITableView的最基本的使用.
UITableView是IOS中用来表现数据列表的,我们今天主要从四个方面来学习:
1.UITableView的最基本的数据显示
2.在UITableViewController中加入导航栏
3.UITableView的编辑功能
4.UITableView下拉刷新数据
首先我们是先学会用UITableView来显示数据.同样ViewController要继承UITableViewController作为应用程序的rootViewController.
class ViewController: UITableViewController
在该类中加入一个数组数据,数组数据时显示的对象.
var data = ["吴统威的博客","编程技术"]
这时候需要覆写两个方法,一个是用来设置UITableView的层次,一个用来设置一个层次里需要设置多少行(这里是data的大小,也就是2行)
override func numberOfSectionsInTableView(tableView: UITableView) -> Int {
    return 1
}

override func tableView(tableView: UITableView, numberOfRowsInSection section: Int) -> Int {
      return data.count
}
到这里就需要将数据显示到界面上,这时候覆写另外一个方法,方法里面创建一个UITableViewCell,这个对象就是代表行,将数据显示到一行一行上
override func tableView(tableView: UITableView, cellForRowAtIndexPath indexPath: NSIndexPath) -> UITableViewCell {

        var cell = UITableViewCell(frame: CGRect(x: 0, y: 0, width: 200, height: 50))
        var label = UILabel(frame:CGRect(x: 20, y: 12, width: 120, height: 20), 0, 0);
        label.adjustsFontSizeToFitWidth = true
        label.text = data[indexPath.row]
        cell.addSubview(label)

        return cell

}
这时候数据显示就完成了,大家可以运行一下模拟器测试.
这里我们会发现,显示总有点怪怪的,不想我们应用程序里那样有个界面的说明栏,那好我们继续往下面走,给UITableView加入导航栏.我们首要就是创建一个UINavigationController的子类,将这个类作为应用程序的rootViewController,然后就通过push方式跳转到UITableViewController这个类中,这时候就可以设置导航栏的相关信息了
class RootNavController: UINavigationController {

    override func viewDidLoad() {
        self.pushViewController(ViewController(), animated: true)
    }

}
我们在ViewController的viewDidLoad中设置导航栏的标题
override func viewDidLoad() {
        super.viewDidLoad()
        // Do any additional setup after loading the view, typically from a nib.
        self.title = "视图列表"
}
导航栏的设置,也完成了,我们继续下一操作,加入编辑功能.加入编辑功能主要是控制编辑状态(是否设置为编辑状态),这里我们需要一个按钮来控制这个状态.在导航栏的右边我们加入一个按钮,在未编辑时,按钮文字显示"编辑",编辑状态时,文字显示"完成".以及给这个按钮赋予不同状态下的事件.
    var rightbar:UIBarButtonItem?
    override func viewDidLoad() {
        super.viewDidLoad()
        // Do any additional setup after loading the view, typically from a nib.
        self.title = "视图列表"
        rightbar = UIBarButtonItem(title: "编辑", style: UIBarButtonItemStyle.Plain, target: self, action: "edit:")
        self.navigationItem.rightBarButtonItem = rightbar

    }
    //编辑
    func edit(sender:AnyObject){
        self.tableView.editing = true
        rightbar?.title = "完成"
        rightbar?.action = "overedit:"

    }
    //结束编辑
    func overedit(sender:AnyObject){
        self.tableView.editing = false
        rightbar?.title = "编辑"
        rightbar?.action = "edit:"
    }
当然,编辑功能还没完成,这里只是能够显示编辑状态是什么个样子,要真正实现操作功能,还得继续覆写几个方法.下面几个方法,大家调试一下就知道他们的功能了,自己可以添加更多相应的逻辑代码
    //编辑模式下的方法
    override func tableView(tableView: UITableView, editActionsForRowAtIndexPath indexPath: NSIndexPath) -> [AnyObject]? {

        println("editActionsForRowAtIndexPath")

        return nil
    }

    override func tableView(tableView: UITableView, titleForDeleteConfirmationButtonForRowAtIndexPath indexPath: NSIndexPath) -> String! {
        println("titleForDeleteConfirmationButtonForRowAtIndexPath")
        return "删除"
    }


    override func tableView(tableView: UITableView, commitEditingStyle editingStyle: UITableViewCellEditingStyle, forRowAtIndexPath indexPath: NSIndexPath) {
        data.removeAtIndex(indexPath.row)
        self.tableView.reloadData()
        println("commitEditingStyle")
    }

    override func tableView(tableView: UITableView, canEditRowAtIndexPath indexPath: NSIndexPath) -> Bool {
        println("canEditRowAtIndexPath")
        return true
    }
ok,到这里编辑功能我们也实现了,最后一步就是加入下拉刷新数据了.我们在viewDidLoad方法中加入更多的代码,主要是创建下拉控件,已经给控件加入相应的事件.
 override func viewDidLoad() {
        super.viewDidLoad()
        // Do any additional setup after loading the view, typically from a nib.
        self.title = "视图列表"
        rightbar = UIBarButtonItem(title: "编辑", style: UIBarButtonItemStyle.Plain, target: self, action: "edit:")
        self.navigationItem.rightBarButtonItem = rightbar
        //self.tableView.editing = true

        ///
        var ref = UIRefreshControl(frame: CGRect(x: 30, y: 20, width: 100, height: 50))
        self.refreshControl = ref
        self.refreshControl?.attributedTitle = NSAttributedString(string: "下拉更新")
        self.refreshControl?.addTarget(self, action: "refresh:", forControlEvents: UIControlEvents.ValueChanged)
    }
func refresh(obj:AnyObject){
println("this is refresh")
self.refreshControl?.attributedTitle = NSAttributedString(string: "正在更新....")
dispatch_async(dispatch_get_main_queue()) { () -> Void in
sleep(3)//休眠3秒
self.refreshControl?.endRefreshing()
self.refreshControl?.attributedTitle = NSAttributedString(string: "下拉更新")
var num:Int = random()
self.data.append("随机数:\(num)")
self.tableView.reloadData()
}
}上面下拉事件中,大家可以加入自己的处理逻辑代码,做自己想要的功能,或者加入获取网络数据,加入到UITableView中.结束刷新数据的方法是endRefreshing().
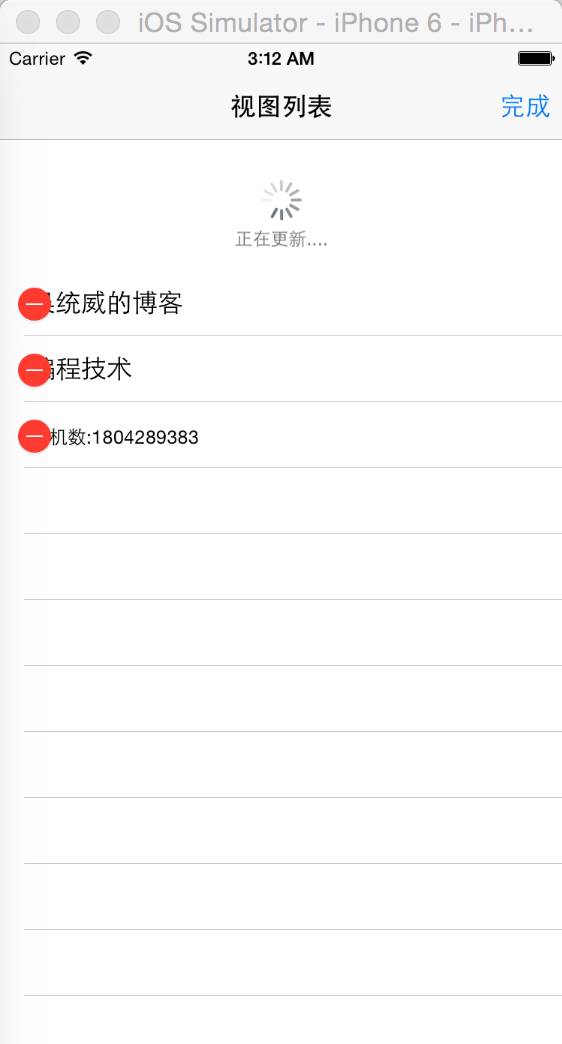
整个四个功能我们已经完成了,这时候可以运行代码,看看效果了.我们先贴上所有代码
import UIKit
class ViewController: UITableViewController {
override func didReceiveMemoryWarning() {
super.didReceiveMemoryWarning()
// Dispose of any resources that can be recreated.
}
var data = ["吴统威的博客","编程技术"]
var rightbar:UIBarButtonItem?
override func viewDidLoad() {
super.viewDidLoad()
// Do any additional setup after loading the view, typically from a nib.
self.title = "视图列表"
rightbar = UIBarButtonItem(title: "编辑", style: UIBarButtonItemStyle.Plain, target: self, action: "edit:")
self.navigationItem.rightBarButtonItem = rightbar
//self.tableView.editing = true
///
var ref = UIRefreshControl(frame: CGRect(x: 30, y: 20, width: 100, height: 50))
self.refreshControl = ref
self.refreshControl?.attributedTitle = NSAttributedString(string: "下拉更新")
self.refreshControl?.addTarget(self, action: "refresh:", forControlEvents: UIControlEvents.ValueChanged)
}
//编辑
func edit(sender:AnyObject){
self.tableView.editing = true
rightbar?.title = "完成"
rightbar?.action = "overedit:"
}
//结束编辑
func overedit(sender:AnyObject){
self.tableView.editing = false
rightbar?.title = "编辑"
rightbar?.action = "edit:"
}
//编辑模式下的方法
override func tableView(tableView: UITableView, editActionsForRowAtIndexPath indexPath: NSIndexPath) -> [AnyObject]? {
println("editActionsForRowAtIndexPath")
return nil
}
override func tableView(tableView: UITableView, titleForDeleteConfirmationButtonForRowAtIndexPath indexPath: NSIndexPath) -> String! {
println("titleForDeleteConfirmationButtonForRowAtIndexPath")
return "删除"
}
override func tableView(tableView: UITableView, commitEditingStyle editingStyle: UITableViewCellEditingStyle, forRowAtIndexPath indexPath: NSIndexPath) {
data.removeAtIndex(indexPath.row)
self.tableView.reloadData()
println("commitEditingStyle")
}
override func tableView(tableView: UITableView, canEditRowAtIndexPath indexPath: NSIndexPath) -> Bool {
println("canEditRowAtIndexPath")
return true
}
//基本的设置
override func numberOfSectionsInTableView(tableView: UITableView) -> Int {
return 1
}
override func tableView(tableView: UITableView, numberOfRowsInSection section: Int) -> Int {
return data.count
}
override func tableView(tableView: UITableView, cellForRowAtIndexPath indexPath: NSIndexPath) -> UITableViewCell {
var cell = UITableViewCell(frame: CGRect(x: 0, y: 0, width: 200, height: 50))
var label = UILabel(frame:CGRect(x: 20, y: 12, width: 120, height: 20), 0, 0);
label.adjustsFontSizeToFitWidth = true
label.text = data[indexPath.row]
cell.addSubview(label)
return cell
}
//////数据刷新设置,可以调用网络数据刷新
func refresh(obj:AnyObject){
        println("this is refresh")
        self.refreshControl?.attributedTitle = NSAttributedString(string: "正在更新....")

        dispatch_async(dispatch_get_main_queue()) { () -> Void in

            sleep(3)//休眠3秒

            self.refreshControl?.endRefreshing()
            self.refreshControl?.attributedTitle = NSAttributedString(string: "下拉更新")
            var num:Int = random()
            self.data.append("随机数:\(num)")
            self.tableView.reloadData()

        }

    }
}import UIKit
class RootNavController: UINavigationController {
override func viewDidLoad() {
self.pushViewController(ViewController(), animated: true)
}
}效果如图
