The Swift Code之UITabBar
我们今天来写一篇关于UITabBar的使用方法,这里直接使用代码来实现,不使用用StoryBoard.在多人合作时开发IOS应用,代码是比较好的方式.OK,我们直接切入正题.
首先我们创建一个UITabBarController的子类,在当前子类中,我们给tabbar设置两个面板,以及设置好对应的tabbar 按钮,相关的代码里有注解
//
//  ViewController.swift
//  study.tabbar
//
//  Created by Tonway on 15/7/5.
//  Copyright (c) 2015年 org.tonway. All rights reserved.
//

import UIKit

class ViewController: UITabBarController {

    override func viewDidLoad() {
        super.viewDidLoad()
        // Do any additional setup after loading the view, typically from a nib.
        //设置面板背景为白色
        self.view.backgroundColor = UIColor.whiteColor(, 0, 0);

        //实例化两个ViewController,来作为tabbar的不同内容面板,且为每个面板加入navigationbar,如果不需要navbar,可以直接设置面板到tabbar.
        //第一个tabbar面板
        let first = FirstViewController(, 0, 0);
        let fbar = RootNavigationBar(, 0, 0);
        fbar.viewControllers = [first];

        //第二个tabbar面板
        let second = SecondViewController(, 0, 0);
        let sbar  = RootNavigationBar(, 0, 0);
        sbar.viewControllers = [second];

        //将主面板加入到tabbar
        self.viewControllers = [fbar,sbar];


        //设置tabbar的选择颜色
        UITabBar.appearance().tintColor = UIColor.redColor(, 0, 0);

        //设置tabbar的不同按钮的显示方式,这里通过tabBar的属性items来获取不同的UITabBarItem,且对应到主面板的排列顺序.
        let firstbar =  self.tabBar.items![0] as! UITabBarItem;
        firstbar.title = "聊天";
        firstbar.image = UIImage(named: "tabbar_mainframe")
        firstbar.selectedImage = UIImage(named: "tabbar_mainframeHL")

        let secondbar = self.tabBar.items![1] as! UITabBarItem;

        secondbar.title = "我"
        secondbar.image = UIImage(named: "tabbar_me")
        secondbar.selectedImage = UIImage(named: "tabbar_meHL")

    }

    override func didReceiveMemoryWarning() {
        super.didReceiveMemoryWarning()
        // Dispose of any resources that can be recreated.
    }


}
然后我们来创建RootNavigationBar这个导航栏的子类,因为,我们为每个面板加入了导航栏,这个子类,什么都不同做,其相关属性,交给内容面板类去做.
//
//  RootNavigationBar.swift
//  study.tabbar
//
//  Created by Tonway on 15/7/5.
//  Copyright (c) 2015年 org.tonway. All rights reserved.
//

import UIKit

class RootNavigationBar: UINavigationController {

    /*
    // Only override drawRect: if you perform custom drawing.
    // An empty implementation adversely affects performance during animation.
    override func drawRect(rect: CGRect) {
        // Drawing code
    }
    */

}
接着,就是创建聊天,和我这两个面板,这两个面板都是UIViewController的子类.
//
//  FirstViewController.swift
//  study.tabbar
//
//  Created by Tonway on 15/7/5.
//  Copyright (c) 2015年 org.tonway. All rights reserved.
//

import UIKit

class FirstViewController: UIViewController {

    override func viewDidLoad() {
        super.viewDidLoad()

        //设置Navbar标题
        self.navigationItem.title = "聊天"
         //加入Label到面板,做展示
        let label = UILabel(frame: CGRect(x: 0, y: 80, width: 300, height: 35), 0, 0);
        label.text = "First Tabbar"
        self.view.addSubview(label)
        // Do any additional setup after loading the view.
    }

    override func didReceiveMemoryWarning() {
        super.didReceiveMemoryWarning()
        // Dispose of any resources that can be recreated.
    }


    /*
    // MARK: - Navigation

    // In a storyboard-based application, you will often want to do a little preparation before navigation
    override func prepareForSegue(segue: UIStoryboardSegue, sender: AnyObject?) {
    // Get the new view controller using segue.destinationViewController.
    // Pass the selected object to the new view controller.
    }
    */

}
//
// SecondViewController.swift
// study.tabbar
//
// Created by Tonway on 15/7/5.
// Copyright (c) 2015年 org.tonway. All rights reserved.
//
import UIKit
class SecondViewController: UIViewController {
override func viewDidLoad() {
super.viewDidLoad()
//设置navbar的标题
self.navigationItem.title = "我"
//加入Label到面板,做展示
let label = UILabel(frame: CGRect(x: 0, y: 80, width: 300, height: 35), 0, 0);
label.text = "Second Tabbar"
self.view.addSubview(label)
}
override func didReceiveMemoryWarning() {
super.didReceiveMemoryWarning()
// Dispose of any resources that can be recreated.
}
/*
// MARK: - Navigation
// In a storyboard-based application, you will often want to do a little preparation before navigation
override func prepareForSegue(segue: UIStoryboardSegue, sender: AnyObject?) {
// Get the new view controller using segue.destinationViewController.
// Pass the selected object to the new view controller.
}
*/
}最后不要忘记在AppDelegate类application方法中,加入一下代码,启动应用程序
func application(application: UIApplication, didFinishLaunchingWithOptions launchOptions: [NSObject: AnyObject]?) -> Bool {
        // Override point for customization after application launch.
        let frame = UIScreen.mainScreen().bounds;
        window = UIWindow(frame: frame, 0, 0);

        let root = ViewController(, 0, 0);

        window?.rootViewController = root;


        return true
}
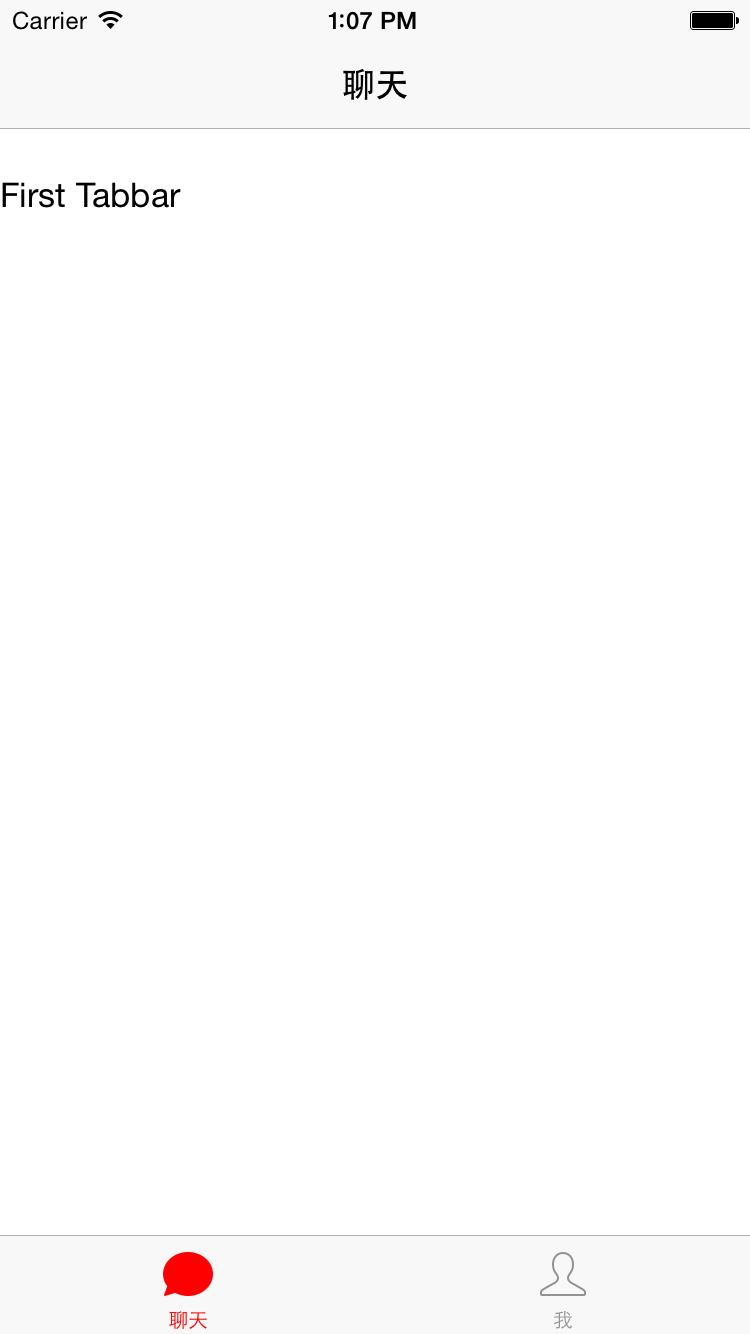
现在我们就直接command-R运行程序,效果如下
