The Swift Code之设置UIButton的不同方式创建,以及不同的状态和外观
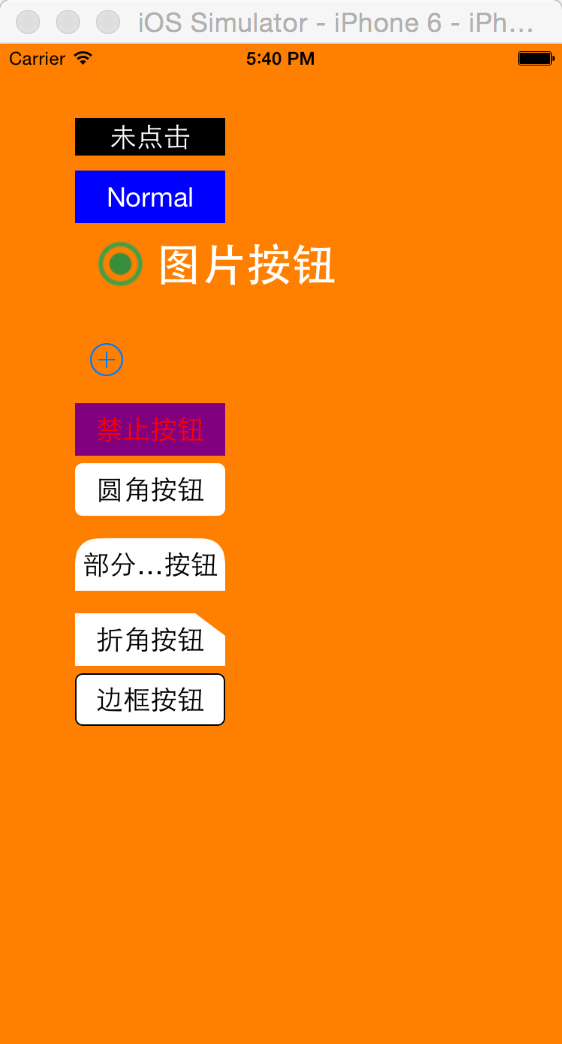
在设置rootViewController之后,在这个control里的viewDidLoad方法里,添加相应的代码.设置了9个不同类型的UIButton
创建了有状态的button,以及添加button事件
创建没有状态的button
创建一个图片加文字的按钮,只要图片就不需要设置title
从系统定义的button类型创建button
创建禁止button
创建一个圆角button
部分圆角button,主要是利用layer的mask属性,在通过CAShaperLayer和UIBezierPath来画
创建折角button
创建border的button
import UIKit

class ViewController: UIViewController {

    override func viewDidLoad() {
        super.viewDidLoad()

        //创建有状态的按钮
        var btn:UIButton = UIButton(frame: CGRect(x: 50, y: 50, width: 100, height: 25))

        btn.setTitle("点击按钮", forState: UIControlState.Highlighted)
        btn.setTitle("未点击", forState: UIControlState.Normal)
        btn.backgroundColor = UIColor.blackColor()
        self.view.addSubview(btn)
        //给按钮添加点击事件
        btn.addTarget(self, action: "clickEvent:", forControlEvents: UIControlEvents.TouchUpInside)

        //创建没有状态的按钮
        var btn2:UIButton = UIButton(frame: CGRect(x: 50, y: 85, width: 100, height: 35))
        btn2.setTitle("Normal", forState: UIControlState.Normal)
        btn2.backgroundColor = UIColor.blueColor()
        self.view.addSubview(btn2)

        //创建一个图片加文字的按钮
        var btn3:UIButton = UIButton(frame: CGRect(x: 50, y: 130, width: 180, height: 35))
        btn3.setImage(UIImage(named: "btn1"), forState: UIControlState.Normal)
        btn3.titleLabel?.font = UIFont.boldSystemFontOfSize(30)
        btn3.imageView?.contentMode = UIViewContentMode.ScaleAspectFit
        //btn3.imageEdgeInsets = UIEdgeInsets(top: 0, left: 0, bottom: 0, right: 0)
        btn3.setTitle("图片按钮", forState: UIControlState.Normal)
        self.view.addSubview(btn3)

        //从系统定义的按钮类型创建Button
        var btn4:UIButton = UIButton.buttonWithType(UIButtonType.ContactAdd) as! UIButton
        //btn4.backgroundColor = UIColor.brownColor()
        btn4.frame.offset(dx: 60, dy: 200)
        self.view.addSubview(btn4)

        //创建禁止按钮
        var btn5:UIButton = UIButton(frame: CGRect(x: 50, y: 240, width: 100, height: 35))
        btn5.setTitle("点击按钮", forState: UIControlState.Highlighted)
        btn5.setTitle("禁止按钮", forState: UIControlState.Normal)
        btn5.enabled = false //设置按钮不能点击
        btn5.setTitleColor(UIColor.redColor(), forState: UIControlState.Disabled)//代表已经禁止
        btn5.backgroundColor = UIColor.purpleColor()
        self.view.addSubview(btn5)

        //创建一个圆角按钮
        var btn6:UIButton = UIButton(frame: CGRect(x: 50, y: 280, width: 100, height: 35))
        btn6.backgroundColor = UIColor.whiteColor()
        btn6.setTitleColor(UIColor.blackColor(), forState: UIControlState.Normal)
        btn6.setTitle("圆角按钮", forState: UIControlState.Normal)
        btn6.layer.cornerRadius = 5
        self.view.addSubview(btn6)

        //部分圆角按钮,主要是利用layer的mask属性,在通过CAShaperLayer和UIBezierPath来画
        var btn7:UIButton = UIButton(frame: CGRect(x: 50, y: 330, width: 100, height: 35))
        btn7.backgroundColor = UIColor.whiteColor()
        btn7.setTitleColor(UIColor.blackColor(), forState: UIControlState.Normal)
        btn7.setTitle("部分圆角按钮", forState: UIControlState.Normal)

        let shape:CAShapeLayer = CAShapeLayer()
        let bepath:UIBezierPath = UIBezierPath(roundedRect: btn6.bounds, byRoundingCorners: UIRectCorner.TopRight|UIRectCorner.TopLeft, cornerRadii: CGSize(width: 15, height: 15))

        UIColor.blackColor().setStroke()
        shape.path = bepath.CGPath

        btn7.layer.mask = shape
        self.view.addSubview(btn7)

        //创建折角按钮
        var btn8:UIButton = UIButton(frame: CGRect(x: 50, y: 380, width: 100, height: 35))
        btn8.backgroundColor = UIColor.whiteColor()

        btn8.setTitleColor(UIColor.blackColor(), forState: UIControlState.Normal)
        btn8.setTitle("折角按钮", forState: UIControlState.Normal)

        let shape8:CAShapeLayer = CAShapeLayer()
        let bepath8:UIBezierPath = UIBezierPath()
        bepath8.moveToPoint(CGPoint(x: 0,y: 0))
        bepath8.addLineToPoint(CGPoint(x: 80,y: 0))

        bepath8.addLineToPoint(CGPoint(x: 100,y: 15))
        bepath8.addLineToPoint(CGPoint(x: 100,y: 35))
        bepath8.addLineToPoint(CGPoint(x: 0,y: 35))
        bepath8.closePath()

        shape8.path = bepath8.CGPath

        btn8.layer.mask = shape8
        self.view.addSubview(btn8)

        //创建border按钮
        var btn9:UIButton = UIButton(frame: CGRect(x: 50, y: 420, width: 100, height: 35))
        btn9.backgroundColor = UIColor.whiteColor()
        btn9.setTitle("边框按钮", forState: UIControlState.Normal)
        btn9.setTitleColor(UIColor.blackColor(), forState: UIControlState.Normal)
        btn9.layer.borderColor = UIColor.blackColor().CGColor
        btn9.layer.borderWidth = 1
        btn9.layer.cornerRadius = 5
        self.view.addSubview(btn9)

        //

    }


    override func didReceiveMemoryWarning() {
        super.didReceiveMemoryWarning()
        // Dispose of any resources that can be recreated.
    }

    func clickEvent(sender:AnyObject){
        NSLog("按钮点击了事件")
    }


}
效果如下
